
© 1997-2000 R. Fellner. All rights reserved
|
Step #1: howto..
| [Previous] [Main] [Next] |
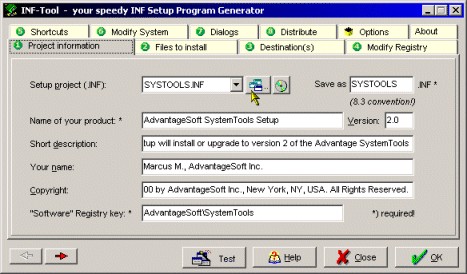
| · | First, enter the desired project name (= .INF setup file name) in the "save as.." field or select a previously designed project from the "Setup project filename" list.
|
| Tip 1: please note that Windows only allows script names which don't extend the "8+3" convention (not more than 8 characters for the file name, INF-Tool will automatically add ".INF" to this name).
| |
| Tip 2: don't use names like "Setup" or "Install" for your script, since this could cause name conflicts with other installations and lead to problems when your user will try to uninstall one of these products. Instead, try to use names that users can associate with your program, e.g. "PopEdit".
| |
|
| |
| Then, enter the following information concerning your installation:
| |
|
| |
| · | Name of your Application *
|
| This name will be displayed when setting up your INF script; it will be used in the Caption bar title and in the Uninstall list of Windows' Control Panel.
| |
| · | Version number
|
| · | a short description of your project
|
| · | your name
|
| · | optional Copyright notice
|
| · | Software registry key (can be used as pre-defined key in Step #4; the user-defined destination path will be stored here - it is required if you offer user-defined destination directories ! It's recommended that you also use it as a 'parent' key for your own registry additions belonging to your software product).
|