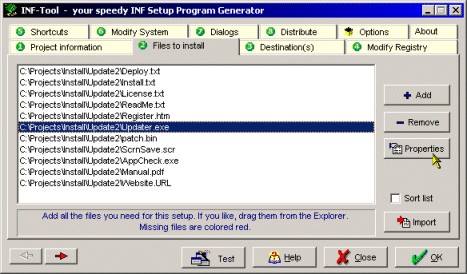
Step #2: which files to install ? / Dependency Check / Copy flags
[Previous] [Main] [Next]


This is the central part of designing your setup project.

Add all the files that have to be installed -
·either by clicking on the "add file" button or  
·by dragging them from the Explorer or  
·by adding complete directories or directory structures (INF-Tool Pro) or  
·by importing a text file which contains a list of your desired files for this project (must contain source file pathnames; may contain comments after a semicolon as first char of the line)  

...whichever you prefer.

scr_step2.jpg

Note:
You don't have to add your INF setup file, INF-Tool will do this automatically when it is required (e.g., if you use the Uninstall feature). More, INF-Tool will also add the AdvPack files automatically if they are required for your selected setup features.

Files that can't be found by INF-Tool, are marked red
in this list. Generation of Distribution archives/directories and the use of "long file names" is only possible if the required files can be found somewhere on your disks! The source paths of the red marked files can easily be changed to the correct ones by clicking the button which shows when the bar is moved over such files.

New: by clicking the "Add file(s)" button, you now have an option to automatically recognize font (.TTF) files
. They will then automatically be added to the correct destination directory in Step #3 and the required registry settings will also be created for you.

Directory selection:
INF-Tool Professional also allows you to select complete directory structures to be added to the list. INF-Tool will automatically add all files contained in these directories to the list and optionally even "remember" them for later synchronisation at upcoming sessions if you have checked the "remember this selection" option in the same window. Please note that due to Microsoft's concept of INF files, just individual filenames may be added in all of these directories. Whether different versions of a specific filename are stored in different directories or not: just the first of these files will be added to the list.


Flags for copy operations

scr_fileprop.jpg
Additionally, INF-Tool Professional allows you to define copy flags
for each file via the "Properties" settings, like "don't overwrite the file if it already exists at the destination directory" or "don't include a version-check". Also, you can prevent files from being uninstalled etc.


The DLL/OCX/VBX Dependency Checker

scr_dllcheck.jpg

By clicking the button named "DLL check" in the copy modes window for library (DLL-, OCX or VBX) files, INF-Tool generates a list of files this library requires for proper operation on the target computer. This is very useful for VB, Access- or MSVC developers which usually have to include many DLL files in order to allow proper operations of their programs.

Simply checking a file in this list will add it to your setup project - however, you should avoid to add files which are already usual parts of typical Windows installations...which would just add unnecessary bloat to your setup package. Usally it's a good tip to consult the manuals to find out which runtime files are required.
Note that unchecking a file from the list will not remove it from your file list for security reasons (you might want to include another version of the DLL file than the listed one or just uncheck a file by accident which is a living part of your program etc.). Don't forget to define the appropriate destination directory for the DLL/OCX files you want to add (you might want to add them to the destination directory of your main application to avoid version conflicts with other DLL files of the same name on your customer's computer).


Table of contents  |   INF-Tool Home page  
banner ad
© 1997-2000 R. Fellner. All rights reserved